When you first install FreePBX (or any operating system for that matter) you’re going to want to update the system and do it thoroughly and correctly. System updates keep your system stable and secure, but knowing the best way to update your system is important to avoid any issues in the process. So what’s the best way to update your PBX and keep it up to date? Read on for details.
Updates vs Upgrades
This guide is for running routine system updates, not upgrading between major FreePBX versions. It assumes you’re running a current, supported version of FreePBX Distro.
Types of Updates in FreePBX
There are two main types of updates you’ll need to stay on top of in FreePBX: Module Updates and System Updates.
Before You Update
It’s always a good idea to perform a backup prior to running any updates and to select your timing carefully. It is rare to encounter problems with module updates, nevertheless, it is impossible for developers to anticipate all possible edge cases so you would do well to avoid busy times and if possible schedule updates on a weekend or some other quiet time.
Another good idea is to check the FreePBX Community Forums for reports of any recent module issues, often times this can save you trouble in case there is a known issue. Module update issues are rare, but developers are human, and sometimes edge cases/issues can happen.
Module Updates
Modules are the individual software components that makeup FreePBX from core components like FreePBX Framework to applications like IVR, Zulu, etc. Each module has a proper display name (i.e. User Management) as well as a shorthand name (i.e. username). Generally speaking, you’ll see the display name in the Web GUI and the shorthand name is typically seen in some system messages and in the Linux command line.
Module Updates via the GUI
To install module updates via the GUI, first, you’ll need to get a list of available updates. Starting in FreePBX 14, these can be found in Admin > Updates > Module Updates. In previous versions, see Admin > Module Admin. To see available updates, click the “Check Online” button near the top of the page.

Once the list refreshes, check the box “Show only upgradeable” to see what will need updating.
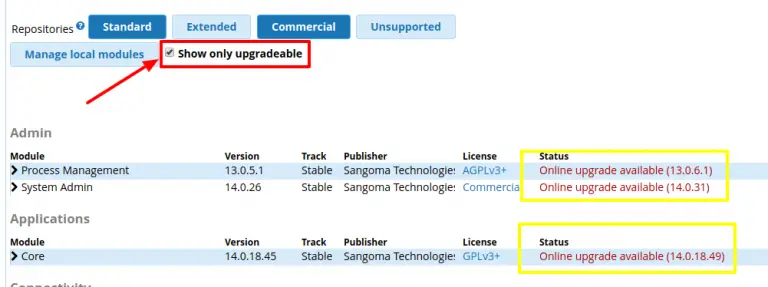
At this point you can selectively iterate through each update (click the title of the module to expand it’s details) and review it’s changelog, process individual updates, and select “Download and Upgrade” for all the ones you want to upgrade, and then click “Process” in the upper right.
Or for expediency, you can click “Upgrade all” in the upper right to proceed to the next step, which is dependency resolution and upgrades.

If there are dependencies (modules that must be updated before other modules can be updated), you may be required to upgrade a portion of the modules, then return to the list and repeat the above steps to download the rest. (this may be required multiple times.)
Otherwise, you’ll see something like this showing you what will be updated:

Click “Confirm” to process the listed upgrades. You’ll see a status screen like this which you should monitor for any error messages. The “Return” button will not appear until all the updates are complete:

Click “Return” to return to the list, and repeat the process to ensure all updates have been completed. When they have been completed, click “Apply Config” in the upper right. This will update the Asterisk configuration with any changes implemented by the module updates. This may take a while depending on the size of your system.
Module Updates via the Linux Command Line
Some people will prefer using the Linux command line because of its speed and simplicity, however, you don’t get the benefit of changelogs, and it’s not as easy to exclude individual modules. Here are the commands you need to do the module update process via the Linux command line:
Show All Online Modules
fwconsole ma listonline
Show Upgradeable Online Modules
fwconsole ma listonline | grep ‘upgrade’ Example output:

Upgrade All Modules
fwconsole ma upgradeall
Wait for the process to complete and you will be returned to a command prompt. Some modules have components that are built from source code and can take a while to complete.
Example output:

Reload Configuration
This is the same as clicking “Apply Changes” in the Web GUI, and is necessary after completing updates:
fwconsole reload
Example output:

System Updates
System updates use the Linux operating system’s plan manager, yum, to download and install server-level components. This includes things like Asterisk, Apache, fail2ban, the Linux kernel, and so on. These updates are important and should be run regularly. System updates can be done via the GUI or command line.
If you are using FreePBX 13, you should use the System Update scripts to keep your system up to date. You should also consider Upgrading to FreePBX 14 if you are still running FreePBX 13 or earlier.
System Updates via the GUI (FreePBX 14+)
While it is possible to do system updates via the GUI we do not recommend it, as it has been known to cause issues.
System Updates via the Linux Command Line
Many people prefer to update via the command line for speed and simplicity. You can do so using the following simple commands:
FreePBX Version 17+ (Debian Based)
apt update
apt upgrade -y
FreePBX Versions 14 - 16 (RHEL Based)
yum -y update
You will be shown a list of available updates, and prompted to answer “Y” to continue:

Once the update is complete, you can then proceed to restart services or the system as necessary.
Restarts after System Updates
Some updates will require restarting components like Asterisk, whereas others may require rebooting the server, such as Dahdi and Kernel updates. If you aren’t sure how or what to restart, you can simply reboot the server. All of this should be done via SSH, and the following Linux commands may be useful:
Restart FreePBX Components
This should be done if Asterisk, sangoma-pbx, or fail2ban are updated, though it’s generally not a bad idea any time you do updates because it will reset permissions as well:
fwconsole restart
Reboot the Server
This is required if the kernel is updated, or if Dahdi is updated:
shutdown -r now
Automatic Updates
FreePBX provides the option to configure automatic updates via Admin > Updates > Scheduler and Alerts. You can have FreePBX email an administrator when an update is available, or perform the updates automatically.
Our recommendation is to enable automatic module updates for security updates only and configure FreePBX to send emails for all other updates. We do not like the idea of updates being run unattended, even if the chance for problems is minimal, it’s one of those tasks we’d rather see completed so as to avoid any nasty Monday morning surprises.
Here’s our recommended configuration:

What To Do If Something Goes Wrong
If you encounter an issue with module updates you can open a support ticket with us and we’ll let you know if we’re aware of a fix. Additionally, the FreePBX Community Forums can be a great help for any issues you may be encountering.
Professional Services
FreePBXHosting.com offers a range of services to help you keep your server updated ranging from one-time updates/upgrades to server management so you never have to worry about updating your server. Click here for more details.