Today’s workplace doesn’t always revolve around a central office, so you need a phone system that provides accommodations for flexible work locations. FreePBX does this best by using Zulu UC. Unlike using a generic SIP softphone, Zulu UC is tightly integrated into FreePBX and is designed to work well on a variety of types of networks. It provides calling features as well as one-to-one and group chat, all hosted right on your existing FreePBX server. If you are new to Zulu UC, you can get a two-user license free for one year via the Sangoma Store, too!
This guide covers getting FreePBX configured to work with Zulu UC, getting a FreePBX Softphones license, getting users set up, and setting up the Zulu UC client.
Prerequisites for this guide are:
- Web Admin & SSH access to a fully updated, activated FreePBX 14+ server
- At least one client device with a speaker & microphone or a headset. (Windows, Linux, Mac, iOS or Android)
- Fully qualified domain name and TLS certificate
Once you make sure you have met the prerequisites, you will need to get your PBX deployment ID and obtain a license for Zulu:
- Get your PBX deployment ID from Admin > System Admin > Activation or run fwconsole sa info at the Linux command line.
- Log in to portal.sangoma.com with your Sangoma account you activated the PBX with Go to Store > FreePBX Systems & Software > Zulu UC
- Locate the appropriate “FreePBX Softphones” license pack and quantity, and click “Add”
- Click Your Cart > Checkout
- Next to your license, under “Deployment Options” enter your deployment ID
- Complete the order and payment
- Go back to Admin > System Admin > Activation and click “Update Activation” and verify you see your Zulu UC / FreePBX Softphones license. (In the unlikely event your Zulu UC / FreePBX Softphones license doesn’t appear, wait a few minutes and try again, and then visit support.sangoma.com to open a FreePBX Commercial Modules support ticket.)
Now we need to verify, and if necessary, enable PJSIP and WS/WSS transports:
- Go to Settings > Advanced Settings and locate Channel Driver and select both. Click “Submit”.
- Go to Asterisk SIP Settings > Chan SIP Settings, find “Override External IP” and Enter your public IP (or set appropriate NAT mode if not cloud hosted) and click Submit
- Then go to Asterisk SIP Settings > PJSIP Settings and set “WS/WSS” to “Yes” and Submit
- Click the red “Apply Config” button in the upper right
- Finally, restart Asterisk (Note: this will drop active calls!):
- Go to Admin > Asterisk CLI
- Enter core restart now in the “CLI Command” field and click “Send Command”.
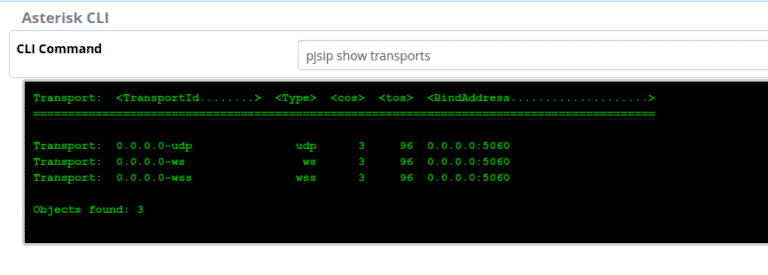
- Enter pjsip show transports in the “CLI Command” field and click “Send Command”. You should see the following:

Now that we have everything setup on the Asterisk side, it’s time to start the Zulu service:
- Connect to your server via SSH
- if you’re a CyberLynk customer, this information is in your “VPS Account Information” or “Dedicated Server Information” email you receive at signup, though you may have changed it. If you can’t access your server via SSH you can open a support ticket for assistance.
- Run the command fwconsole start zulu
- You should see the following output (PIDs will vary of course):
[root@myserver ~]# fwconsole start zulu
Running FreePBX startup...
Taking too long? Customize the chown command, See http://wiki.freepbx.org/display/FOP/FreePBX+Chown+Conf
Setting Permissions...
Setting base permissions...Done
Setting specific permissions...
42828 [============================]
Finished setting permissions
Unable to run Pre-Asterisk hooks, because Asterisk is already running on PID 2240 and has been running for 1 minute, 34 seconds
Running Asterisk post from Zulu module
Enabling the Asterisk ARI Server
Increasing HTTP Session Limit
Changing Websocket Mode to PJSIP
Reloading PBX to update new settings...Done
Enabling PJSIP Websocket server
Websocket changed, updating webrtc clients...Done
Starting Zulu Server...
[>---------------------------] < 1 sec
Started Zulu Server. PID is 17487
Once Zulu is running you can move on to getting one or more users setup:
- In the Users tab, make sure you have a user for the extension you wish to use to test.
- Setup a User Management group with Zulu privileges
- Go to Admin > User Management and click on the “Groups” tab
- From the drop down, select “PBX Internal Directory” and then Click “Add”
- Give the group a name, description, and select some users

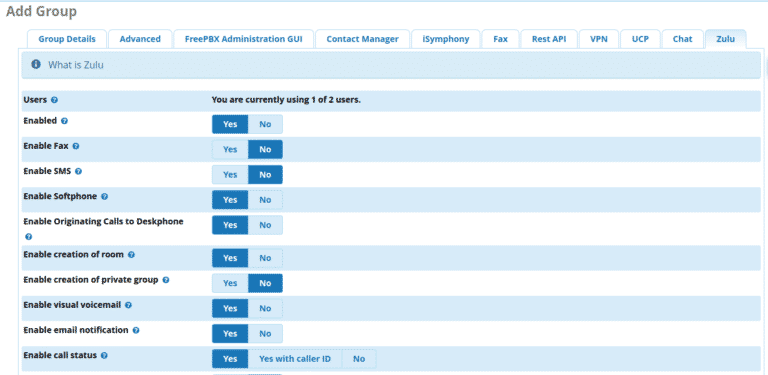
4. Click the “Zulu” tab and set the permissions to taste. Below is an example:

5. Click “Submit” then click the red “Apply Config” button in the upper right.
3. If you have email setup and working, you can email the user a password setup link:
1. Go back to the users tab
2. Edit the user and make sure there is an email address entered in the “User Details” tab, and click “Submit & Send Email to User”
If the user receives an email and the password in the email does not work, have them use the link to create a new one.
4. You can click the key icon in the users list to set the password manually for the user if you prefer.
Check the firewall and enable responsive firewall if you plan to allow remote users:
- Go to Connectivity > Firewall > Responsive Firewall tab
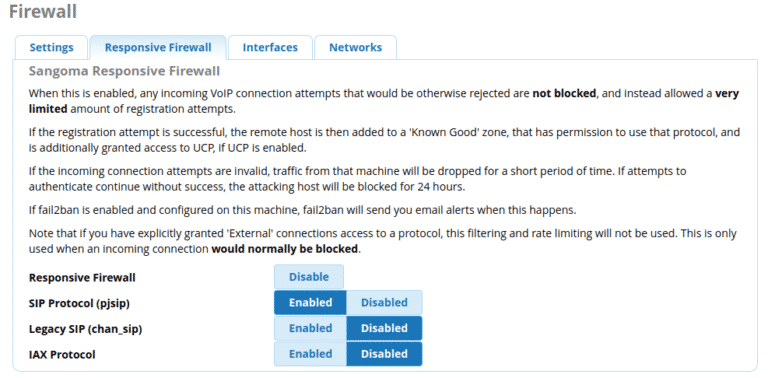
- Enable Responsive Firewall and enable SIP as shown below:

Once you have one or more users setup with appropriate permissions, you’re ready to install a client and test:
- Go to the following URL to download: https://wiki.freepbx.org/display/ZU/Zulu+3+Client+Installation
- Install and launch the client. On Windows, you may need to allow the client through Windows Defender.
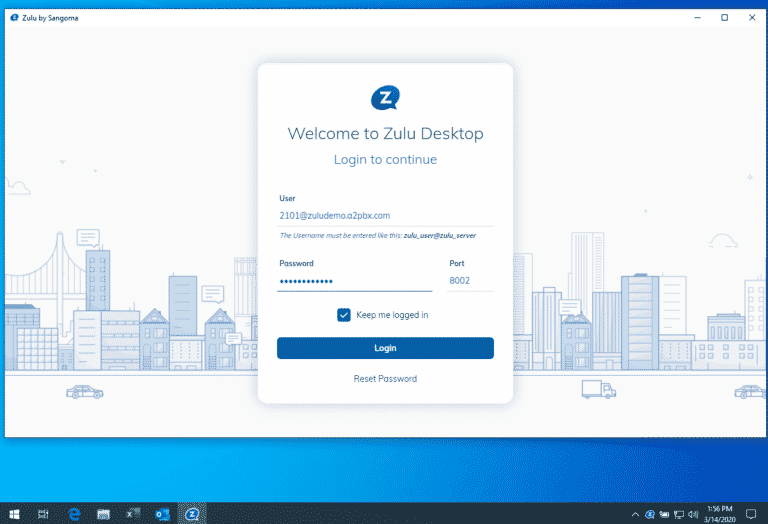
- Add your account using the username format “username@your-FQDN.com” password you set up in the previous step:

4. Once set up, you can try placing a test call. If you have trunks and extensions already set up, you can dial as you would on any other extension. However, if this is a new server you can try dialing feature codes, such as *60 for the talking clock, or *43 for the echo test.
At this point, expanding your Zulu user base is just repetition of the instructions above.
If you have an active service with us here at FreePBXHosting.com, you can contact us for setup help; if you aren’t able to get things working our professional services team can do the initial setup for you for $149.99. Click here to reach out!


