Recent updates to the FreePBX Firewall UI have prompted us to revisit this topic to include some of the new functionality and features. This guide will help you understand how the firewall works and perform a basic level of configuration to ensure your PBX is protected while remaining accessible to your users.
Before getting started though, make sure you update your PBX and log into the GUI and activate FreePBX either via the first run wizard or via Admin > System Admin > Activation.
Enable the Firewall
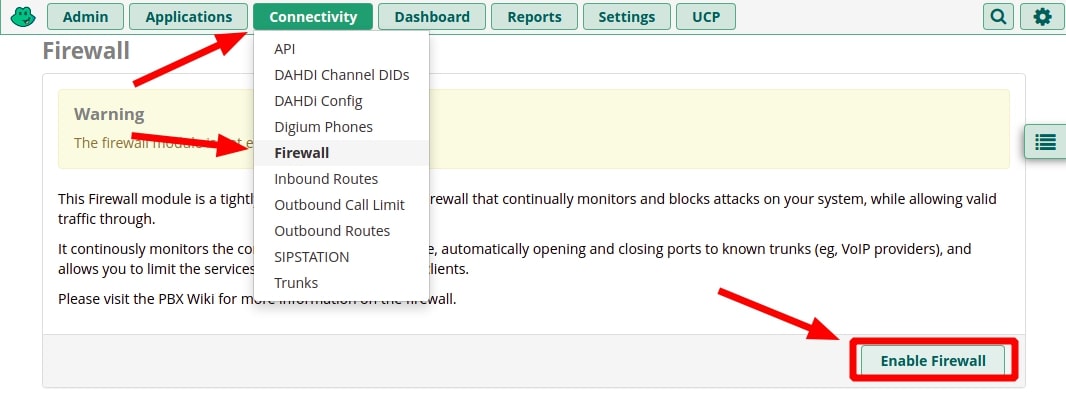
Out of the box, the FreePBX firewall is not enabled because otherwise, you’d likely not be able to access the server to configure it. So this is one of the first things you’ll want to attend to. If you’ve already enabled the firewall during the first run wizard, you can skip to the next step.
Instructions:
- Log into your FreePBX Administrator Control Panel
- Go to Connectivity > Firewall
- Click “Enable Firewall“.
This just enables the firewall; unless you have pre-existing rules, it is still not blocking anything. Be sure to keep reading.
Add Your Network to the Firewall
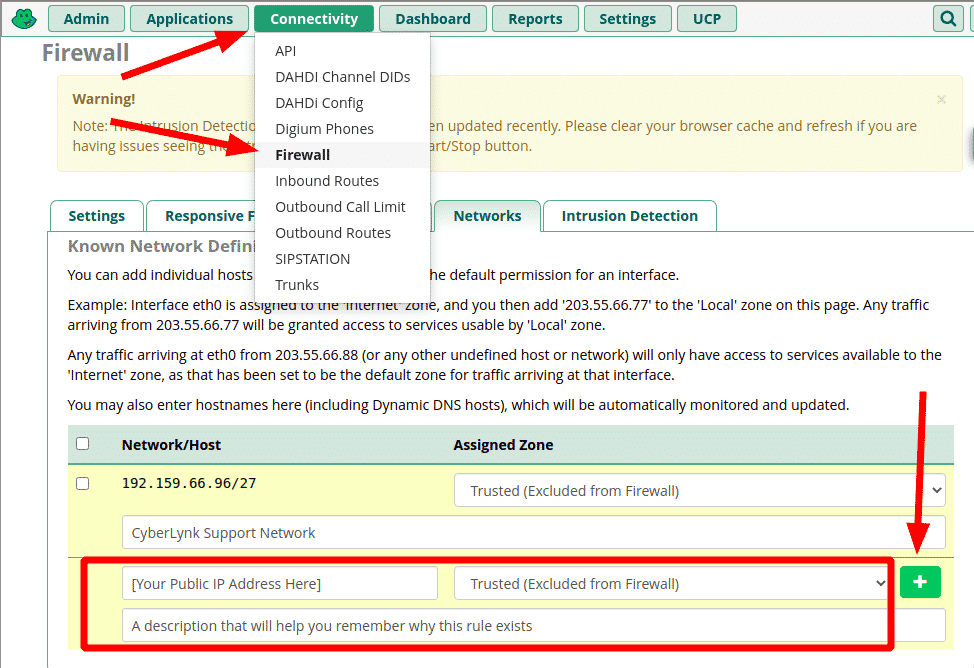
To ensure you do not block yourself in the next step, you’ll want to add your IP address to the firewall’s “Trusted” zone. This zone is for networks you want completely excluded from the firewall’s rules, so use this carefully. This would also be a good time to add CyberLynk’s support network range to your firewall to allow us to help you if necessary. The firewall will most likely have automatically added the IP you are currently on, but now is a good time to add any additional IPs / CIDR networks from which you will want total access to the FreePBX server.
Instructions:
- Go to Connectivity > Firewall > Networks tab
In the next available slot, enter the following:
- Network/Host: The IP address or CIDR network you want to allow through the firewall
- Assigned Zone: Trusted (Excluded from Firewall)
- Description: Something to help you remember why the IP / network is in the firewall
- Click the green “+” (plus symbol) button to apply the rule.
- Repeat and add “192.159.66.96/27” if you want to allow CyberLynk support access to your PBX.
This can be done via the command line using “fwconsole firewall”. For instructions, type “fwconsole firewall –help”.
Intrusion Detection Sync
Intrusion Detection is now incorporated into the FreePBX Firewall GUI. To ensure that trusted IPs and networks with registered phones do not get blocked by intrusion detection, complete the following steps.
Instructions:
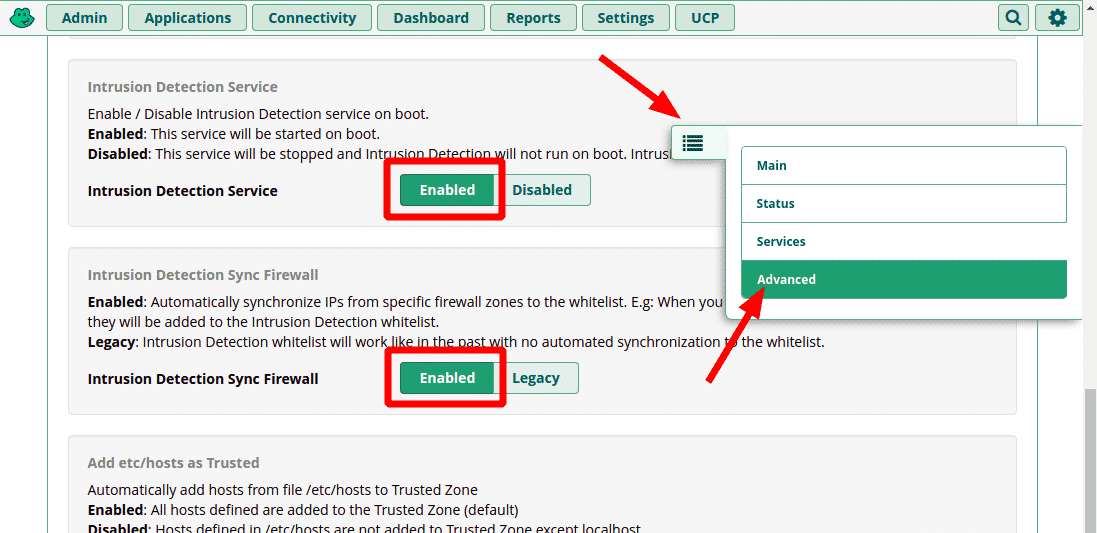
- Go to Connectivity > Firewall and select Advanced from the pop-out menu on the right
- Go to the Advanced Settings tab
- Locate and enable “Intrusion Detection Service” and “Intrusion Detection Sync Firewall”
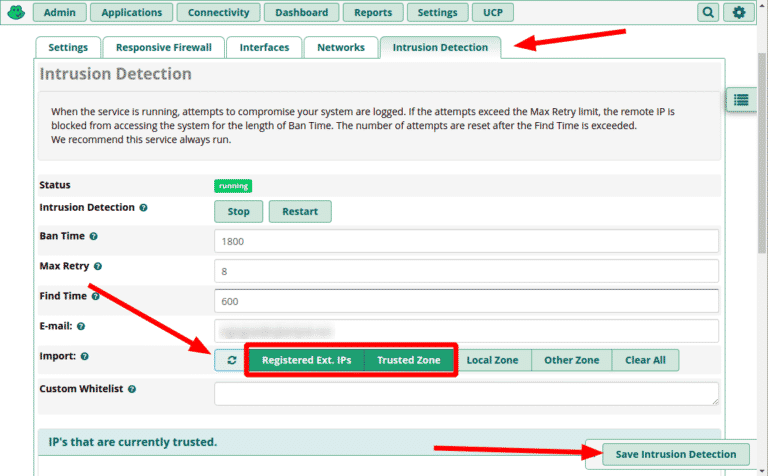
- From the pop-out menu, choose Main and go to the Intrusion Detection tab.
- In the Import section, enable “Registered Ext. IPs” and “Trusted Zone”.
- This will automatically whitelist IPs that have phones registered to the PBX as well as trusted networks.
- Click the button on the left of the Import section to load matching IPs into the whitelist
- Click “Save Intrusion Detection”
Enforce Firewall Rules
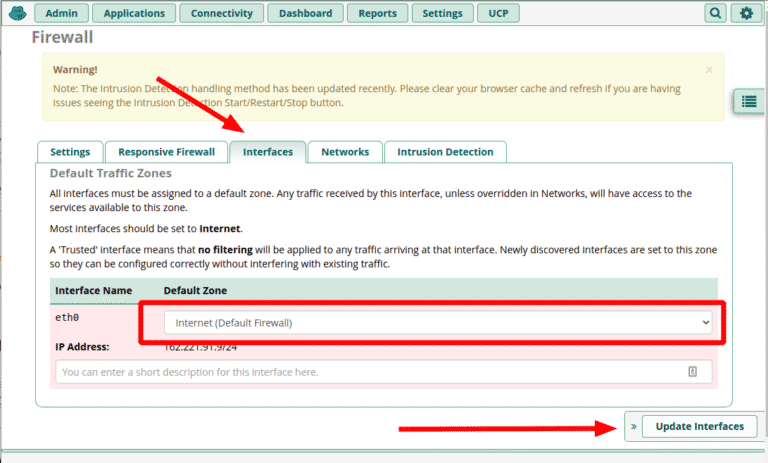
Now that you’ve trusted your network, you need to enforce the FreePBX Firewall’s rules by placing your public facing network interface in the “Internet” zone. On hosted PBXs this is typically “eth0”.
Instructions:
- Go to Connectivity > Firewall > Interfaces tab
- Change the zone for “eth0” to “Internet (Default Firewall)
- Click “Update Interfaces”
This effectively enables the firewall for all traffic on eth0. If you have other interfaces configured they may appear here as well and can be assigned different zones. For example, if you have a LAN interface or a VPN, you could assign it to “Local” or “Trusted”.
If you didn’t do the previous steps you may get blocked. If that happens see this guide on getting unblocked.
Enable Responsive Firewall (Optional)
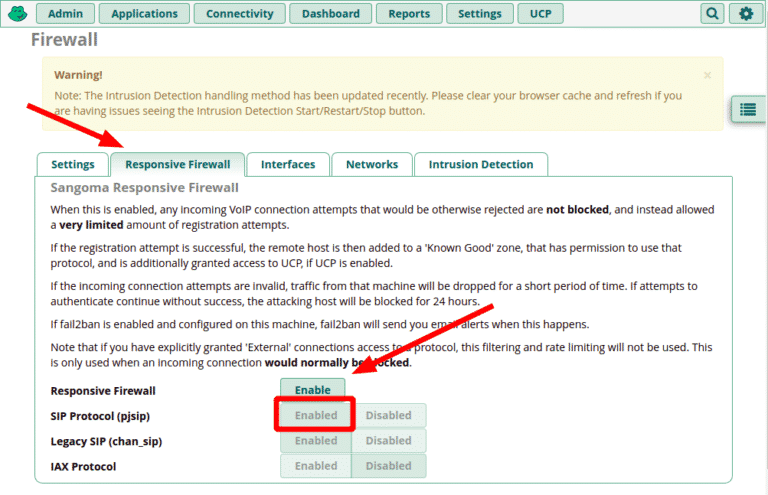
If you plan to have remote users who are not at a location with a static IP address, you may find the Responsive Firewall feature helpful. This will permit phones and UCP users to attempt to authenticate from any network, and add the successful ones to the firewall/intrusion detection automatically. Please note that this will not allow access to administrative resources such as the Admin Control Panel or SSH which should be strictly limited to known / static networks.
Instructions:
- Go to Connectivity > Firewall > Responsive Firewall tab
- Click “Enable” to turn the feature on
- Select the protocols you will be using:
- SIP Protocol is all that is needed for most modern deployments. It supports chan_pjsip extensions.
- Legacy SIP is needed if you have extensions created using the obsolete chan_sip protocol.
- Note: this protocol will be removed eventually, so click here to learn how to convert to chan_pjsip.
- IAX Protocol is used for Asterisk’s protocol for linking multiple PBXs.
If you need help setting up the firewall on your FreePBXHosting VPS or Dedicated server, please check out our FreePBX Professional Services. If you run into problems, you can contact support for help.


